Editing Blog
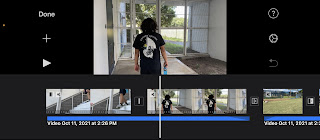
Today I began the process of choosing which shots would be included in the final result and in what order they will be placed in the film. I chose to edit this project on the movie because I believed that working with familiar software would allow me to create the best picture possible while learning more sophisticated tools for future projects. Since of the transferability across all of our recording devices, I also chose this program because it would allow my group to effortlessly import the takes we captured. I started by placing the takes in the desired chronological order and moving backwards from there.
After I had assembled the clips in this manner, I began to review them and delete those that were clearly unusable in the final output. This meant deleting the worst versions of retakes as well as takes that didn't match the commercial I wanted to show. Some scenes were even completely removed during this process. The most notable example was the removal of a scene in which the actor walked across the front of the camera towards the soccer field. We opted to take it out because it provided little value to the advertisement and slowed it down. This empty space was filled with more fast-paced dribble and skill moves that make the commercial seem more athletic-focused.
I began placing the takes in the video timeline once I had selected which takes should make the final cut and in what order they should be placed. I muted the majority of the clips after placing them in the proper order, intending to handle the audio editing and mixing in the next editing session. The issue of meeting the deadline arose shortly after that. The initial stage in this work was to cut some of the clips in order to make the commercial more efficient in delivering its main message and appear faster-paced. After I finished cutting the clips, I opted to speed up some of my other pictures, which gave the skill moves a more amazing, fluid, and fast-paced appearance.
The final decision made during this editing session was to add a motion logo of the Powerade logo. This was by far the most difficult aspect of the editing process. This is because I had to use the greenscreen tool to remove the background and position the video track over the outro when creating the motion logo. This was challenging because I had never used the tool before and struggled to understand it. However, after several efforts, I finally grasped the tool and was extremely pleased with the outcome. Overall, I had a pretty busy day today, and I'm one step closer to presenting my final project.


Comments
Post a Comment